Ever heard the saying “all fingers and thumbs”? Today we are jumping from our previous topics of whole arm movement and postural support, to the ease of movement, control and power of the fingers and thumbs in playing a musical instrument.
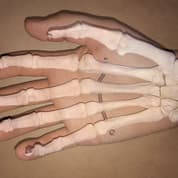
Proportions of the fingers
and thumbs in the hand
We often receive questions about reducing hand tension, improving finger control, and increasing speed of the fingers. The specific actions of the hands will naturally depend on the instrument, so we cover some of the fundamentals that apply broadly, whatever you are doing with your hands. Funnily enough, the use of the hands can play a significant role in using the voice as well… more on that later.
The length of fingers and thumbs
Take a look at your hands. If you had ‘x-ray vision’ you might be surprised at the proportions of the fingers and thumbs in the hand, compared to how we usually see our hands.
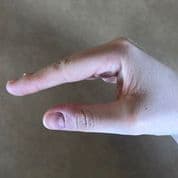 As you observe your hands, notice that the fingers move from the hand about two-thirds of the way up the palm. To see this clearly, turn your hand over and locate your knuckles. Bend your fingers forward from the knuckles, keeping the finger joints straight, and then turn your hand back over to see where the knuckle joints are in your palm. As you turn your hand over and back, you can see how the fingers look longer on the back but shorter on the front.
Another way to get a sense of this is to measure the length of your middle finger from the back of your hand, from knuckle to tip, and then use that measure to assess the length of the finger along the palm of the hand.
It can be surprising to discover how long that middle finger is! When you move the fingers as if you are playing your instrument, think about the length of the fingers, and where they are moving from. This can lead to new sensations in the ease and facility of finger movement.
Taking that measure of the length of the middle finger, now bring it to compare with the length of your thumb. The primary thumb joint, where the thumb moves to be able to meet the other fingers (in ‘opposition’), is just above the wrist. The thumb moves flexibly, oriented across the palm, at right-angles to the fingers. And it’s really long! As long as the middle finger. As you explore this structure, you may find the ease of action and the range of movement of thumb can increase.
Hands are curved
Now observe how your hands are curved. The fingers are naturally oriented to apply pressure or grasp things with the fingertips by curving forward. This is the first curve of the hand.
The thumbs are naturally oriented to cross over the palm, as if the hand could fold in half along its length; this is the second curve of the hand.
Combined, the curves enable us to grasp, and to ‘cup’ the hand to hold water. If you flatten your hand out on a table surface, you will notice that as the hand spreads out, and the curves decrease, the fingers and thumbs gradually point more outwards rather than inwards. If you attempt to completely ‘flatten out’ the hand, or stretch it forcefully to maximum width, the curves reverse, and the extra effort you apply goes to arching the fingers backward (collapsing the knuckles), so that the fingers begin to lift off the surface.
Attempting to make the hand ‘bigger than it is’ has the effect of stiffening the hand and pulling the fingers away from the line of action needed for most instrumental playing. Extra tension will be generated if you attempt to flatten the hand and at the same time press with the fingertips – making a ‘claw’ out of your hand.
There is a relationship between over-stretching the hand, which makes it arch backwards, and overstretching the body as a result of trying to ‘stand straight’ or ‘stand tall’. Standing ‘too straight’ will cause the torso to arch backwards and become stiff, and the tension generated by standing or sitting over-straight, will affect finger movement, making hand movements stiffer as well.
You may see this happening in the hands of a singer who is working to produce power in their voice. As the muscular effort to produce the voice increases, so tension in the arms and hands may also increase, providing a visual indication of the overall level of strain being employed in producing the voice.
Into practise
Let’s take these observations into action as your fingers work with the instrument, stopping the holes, pressing the keys, moving the strings.
1. Explore easing the action of the hands by attending to your dynamic postural support as you play.
2. Drawing on the experiments above, explore conscious cooperation with the length and movement of your fingers and thumbs and the shapes of your hands.
3. Remember that it is not just your fingers you are observing, but the movement of the keys, the sense of contact with the flute or vibration of the strings, so that you can listen to and produce the sound that you intend to produce.
Let me know if this has made a difference to your playing or to how you think about teaching. Your feedback and requests for future topics are very welcome.
For more of the best in classical music, sign up to our E-Newsletter

